This article contains information on using the job wizard to set up and manage migration jobs in Simply Migrate, including selecting data sources, assigning SMTP addresses, setting date ranges, and starting batch services.
Once you have completed the Installation and Configuration steps, you are presented with the job wizard to begin the migration process.
Setting Up Migration Jobs
Use the following steps to guide you through the wizard.
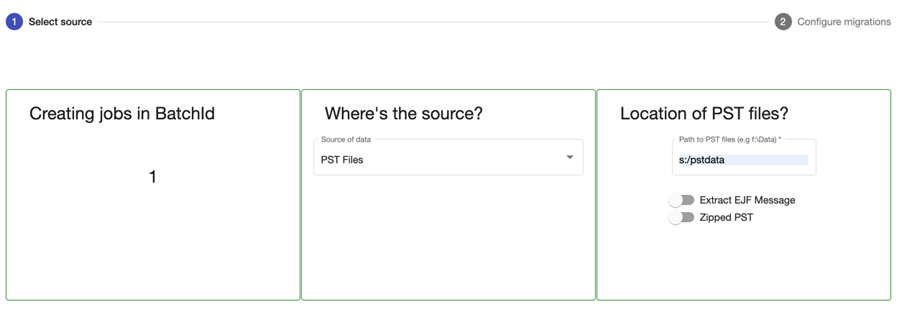
- Select your data source (e.g., PST / zipped EML) from the drop-down menu – you will then be asked to provide a path to where your, e.g., PST files are. Please ensure the account running the dashboard & batch controller service has access to the path.
| Note: |
Mapped drives will not work. |
|
 |
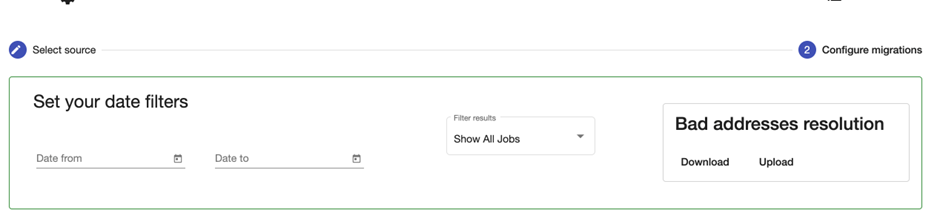
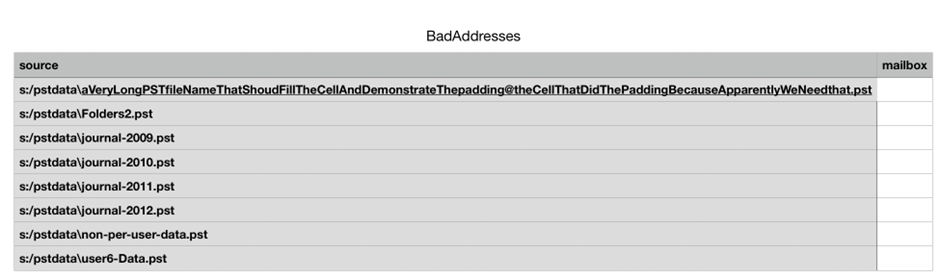
- The system will read the file name and look for the SMTP address to assign it. If it doesn’t automatically map to an SMTP address, you can still create a job; they will just get archived as Non Per User data. If you want the data assigned to a specific address, you must go through and resolve files against the mailbox. You can do this by manually typing in the user's address next to the PST in the table. Or, if there are many, you can download bad addresses at the top. This will give a CSV of all the PSTs with users missing, fill in the relevant mailbox next to each PST then upload the updated CSV back to have the PSTs assigned to those mailboxes.
|

 |
- Select a date range. This depends on your required retention period from when you became a Mimecast customer. As we want to split the jobs into manageable sizes, more than one job might be created during this process.
|
 |
- Click ‘Create Jobs.’ The job(s) have been created.
|
|
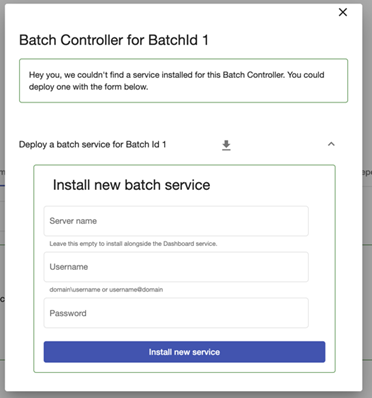
- To migrate the jobs, the batch service will need to be started. If one isn’t installed, this will be prompted after creating the jobs to move the migration. If you need to select an existing batch service or create a new one, go to Management and Reporting in the Management Tab, select the Status icon to the right of the batch you would like to run, and you will see the batch controllers deployed.
| Note: |
- The fully qualified username and password used to install the batch service will need to be the same as the credentials used to install the dashboard.
- The server name can be blank as it automatically picks up the local server.
|
|
 |
Viewing Jobs
To view created jobs, go to Management and Reporting, click on your Batch, and it will display the list of jobs within that batch.
Accessing the Job Wizard again
If you need to use the job wizard at any other time, go to the Management and Reporting tab from your main dashboard, where you will see the first batch automatically created for you. For most migration jobs, you will only need one batch.

Comments
0 comments
Please sign in to leave a comment.